Sometimes, you can mistake your phone’s pre-installed apps as some spyware or threat because of their unusual package name. And the com.sec.android.app.camera is one such puzzling name! If you are a Samsung user, it can seem familiar to you because it often remains in your user history.
So, before you jump to any other scary conclusion about it, let us analyze its ins and outs!
In order to help you decide whether you want to keep the package or get rid of it, we will list down its functions and features. Also, we will explain some workarounds, in case you are facing any issues with the package. Read on.
What Does Com.Sec.Android.App.Camera Means?
You might come across the com.sec.android.app.camera listed on your Google Activity. And such a lengthy name for a single app can quite confuse you. Let us bring you out of the confusion. It is the APK or package name of your Samsung phone’s pre-installed Camera app.
Now, it might bug your mind that what does com.sec.android.app.camera means overall and why such a lengthy name is used for a simple camera app. To clear your doubts, let us break down the name.
Most Android packages start with the Com prefix. The Sec part refers to Samsung electronics. And the rest of the package parts are quite self-explanatory. It means that it is an Android Package for the camera app. Some of the main functions and features of this package are:
- Because of this package, you can click pictures or shoot videos. Also, it helps to render the videos.
- The Android camera app can store or organize photos in the folders with the package.
- It is needed to accept any editing software or program from the Playstore for your phone camera
This package keeps running in the background to make your Android camera experience smoother and better. But sometimes it may start acting up due to several reasons. Let’s find out the causes of its problem and how you can fix the issue.
How to Fix the Com.Sec.Android.App.Camera Sudden Crash Issue?
Whether you are using a mid-range or high-end Android, you might face technical issues with its camera once in a while. The system camera app can crash or force stop. And you might receive a notification that the “Camera failed” or the “com.sec.android.app.camera has stopped working”.
Here are the ways to troubleshoot the issue:
1. Set the Permissions Correctly
It can happen that on your new Android phone while opening the camera app for the first time, you have forgotten to grant the permissions it requires. Or due to recent updates of your phone’s OS or the camera app, the permissions might have changed or switched.
In that case, you need to allow the permissions following these steps:
- From your Phone’s Settings menu, find and open the system Camera app
- If you cannot find the in-built camera, you can click on the Apps option. And then press the three-dot menu.
- From there. select the Show only System app or Default app option. It will help you to find the system camera easily.
- Once you are on the Camera app info page, look for the Permissions option.
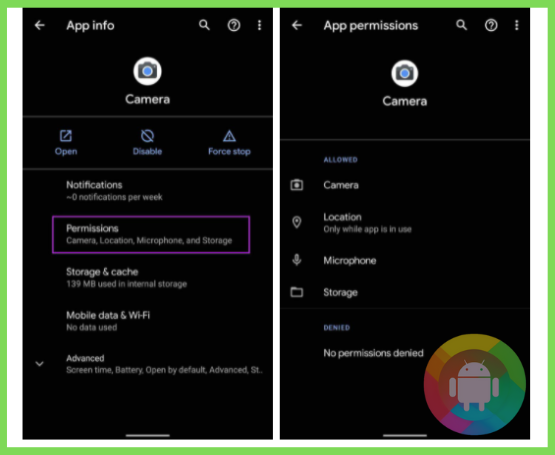
- After clicking on the Permissions, you must allow or enable the Camera, Location, Storage, and Microphone permissions if they are under the Denied section.
- Lastly, make sure that there are no permissions left denied under the Denied section. It should show “No permissions denied” texts. It means that you have correctly set all the permissions necessary for the Camera.
Now the camera package and the camera app should run smoothly without crashing. If not, do not forget to try out the following workarounds.
2. Force Stop Your Phone Camera
Sometimes a quick force stop can resolve many issues like slow loading or sudden crashes of any app. And force stopping does not inactivate the program. It even sometimes removes the misbehaving codes or glitches. So, to give a fresh start to your camera, here are the steps with this method:
- From your home screen, app drawer or the Settings find the Camera app.
- In order to access the “About” page or “info menu” of the app, you need to open the app from Settings. Or, you can do so by long-pressing the app icon from the home screen.
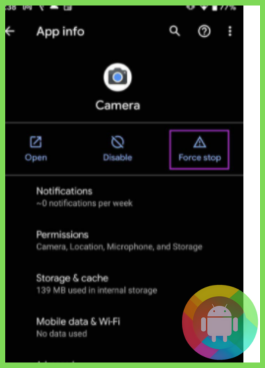
- Then click on the Force Stop option located at the top corner under the Camera name. It will immediately stop all the running operations of the app.
After restarting your phone, use your camera. It should perfectly be ready to click or shoot your precious moments.
3. Clear Cache
Like any other app, the camera app or its package store the cache files in the background. It helps to load the app quickly. If you do not clean the cache once in a while, the over amount of cache files can go corrupt. Such files prevent the camera from running smoothly. You need to get rid of these caches with these simple steps below:
- Launch the Settings screen and find the Camera app and open it.
- If you cannot find the app from the list, search for Camera in the Search field located at the top-right corner of the Settings display.
- Once you go to the camera info page, you need to click on the Storage and Cache section.
- Based on your phone model, the Clear Cache option can be at the bottom or top (under the App name)
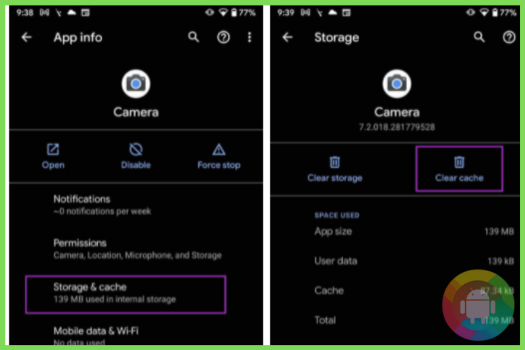
- Click on the Clear Cache option, and then restart your phone.
This method should resolve the issue. If the problem lies mainly in the camera cache.
4. Use Third-Party App
If no solution seems to work, you need to use a third-party camera app. You can find any such app on Google Playstore or your Galaxy Store. For this method, all you have to follow is:
- Before you download another app, you need to clear the defaults of the Built-in camera. For that, open the Settings menu first.
- Click on the All Apps and Notification and open the Camera app from the installed apps list.
- Once you are on the info page, scroll down a bit to open the Open “By Default” option.
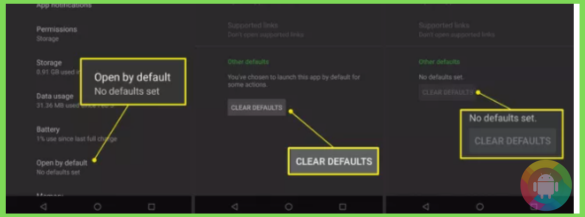
- Now click on the Clear Defaults. And it will ensure the system camera app is no longer the default app. Once you successfully remove the defaults, “No defaults set” texts will be on the info page.
- Then proceed to the Play Store and search for a camera app that fits your needs. After checking the reviews of some third-party apps, decide which one you want to go with. There are many as such Pixtica, Procam X, Open Camera, etc.
- After downloading the app, open it and you might receive a popup that says “set as default”. So, choose that option.
- However, if the default pop-up does not appear, double-tap the physical Power button and a pop-up will let you choose which app you want to set as the default camera.
- From there select Always, then choose the camera app you have downloaded.
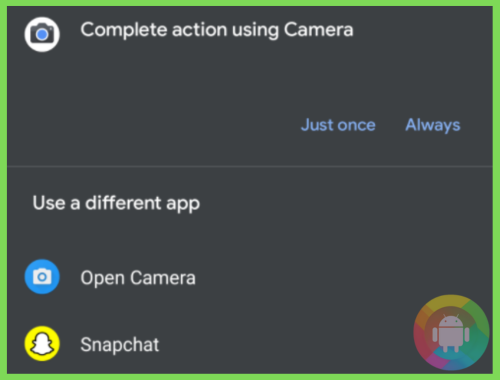
Now the third-party app will work as the default camera. However, you can use the downloaded app even without setting it as default.
If this method does not work, that means the technical issues are in the phone’s system or other apps that block the camera app. But luckily, we have solutions for those too. Go through the next methods below –
5. Safe Mode
Entering safe mode on your Android will always help you decide whether to take the phone to a repair shop or you can fix the issue on your own. Because this mode lets you diagnose whether any third-party app or the system camera itself is the culprit for the sudden crashes. So, enable the mode with these steps:
- If you long-press the physical power button some options will be on the screen. Then you need to release the power button and long-press the Power off option from the screen. It will prompt a “Reboot to safe mode” popup. Click on Ok from there.
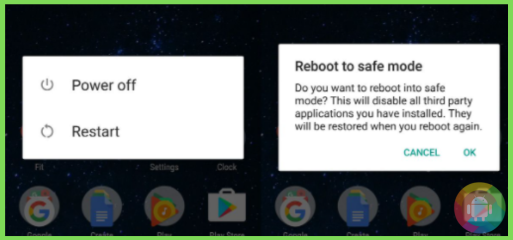
- In no more than one minute your phone will restart on its own. If you have successfully followed the steps you should see a Safe Mode text on the bottom left corner of the screen.
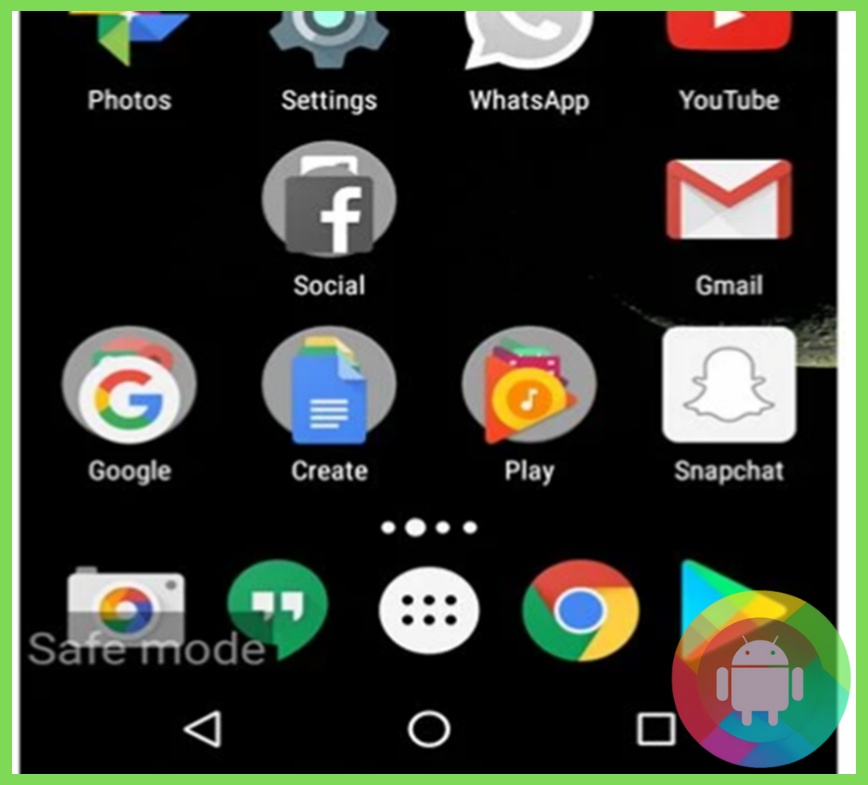
- Try to use the built-in Camera app in safe mode for a while. If it still does not open, or it crashes with the error notification, you must take the phone to the repair shop.
- Or if no issue occurs while using the camera in safe mode, some third-party apps are causing the problem. Restart the phone to disable and exit the safe mode.
- Now, long-press all the third-party apps one by one. It will give you the option to open the info page of the apps.
- From the info page, click on the Storage option. Then select the Clear Cache and Clear Data options to remove any corrupted data of those apps.
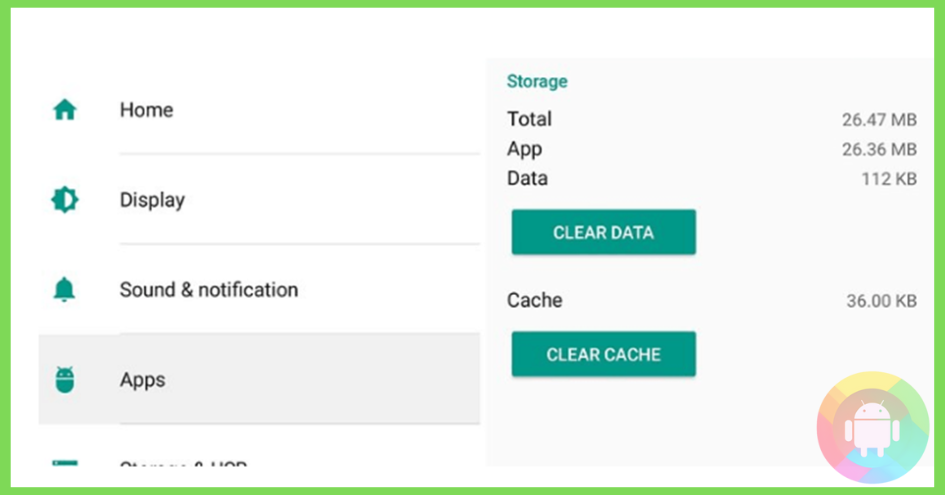
However, if you no longer use those third-party apps, click on the uninstall button. Then you should not face any issue when opening the camera.
6. Update the Android OS
Sometimes, you might forget to upgrade to the latest version of your Android OS. And such outdated OS can be problematic to the default apps including the camera package. The previous OS might not be able to fix the bugs that can resolve the camera issue.
The latest updates often come packed with security patches to fix any sort of technical error or glitches. So, follow these steps given below:
- Turn on the mobile data or Wi-Fi connection on your phone.
- Open the Settings screen, then proceed to the “About Phone” option.
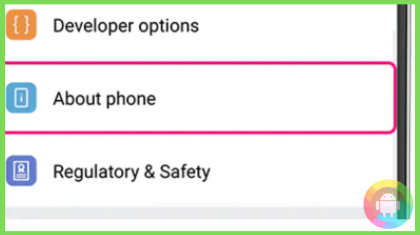
- Then click on the Check now for Update option. It will give you “Install Now” or Install System Software” options. Click on the option.
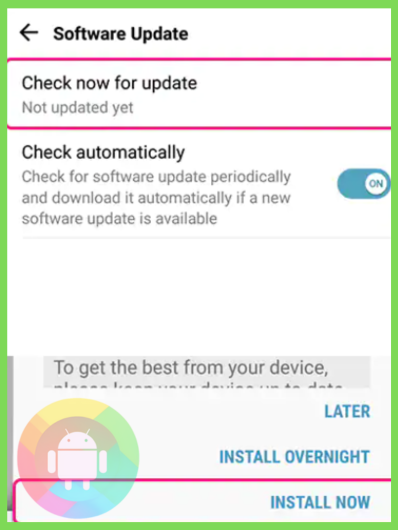
Your phone will go all black and the Android Robot will show the update percentage. After a while, the phone will restart and you are done with the update. It will remove the bugs, stuck codes, or glitches so that the camera can function properly.
7. Factory Reset
When no trick seems to be working, a factory reset should be your way out of this problem. It will take your phone to a blank slate. And such factory state of the software most of the time is effective to fix the com.sec.android.app.camera issues. So, let’s jump into the process right away:
- A factory reset will erase all your data if you do not keep a backup. So, go to Settings and tap on System to open the Backup option.
- Now turn on the Backup to Google Drive option and tap the Back up now button.
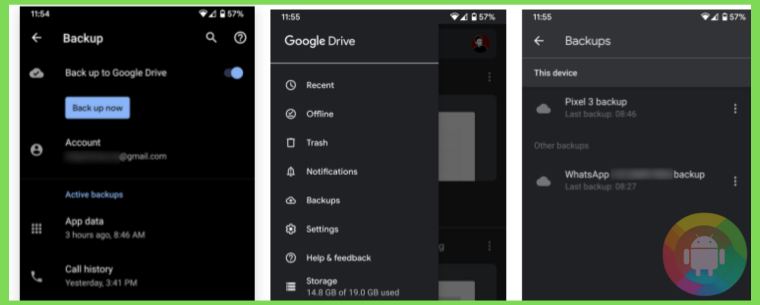
- You can keep the photos and contacts on your PC or Google drive.
- Now open the System option from the Settings and click on the “Advanced” button.
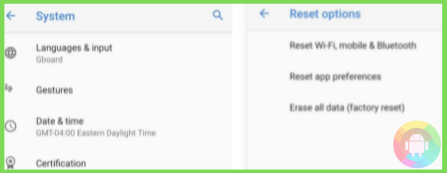
- Lastly, select the Reset options to choose the Factory Reset or Erase All Data option. You may need to enter your passcode for confirmation.
After the reset, the issue should not irritate you anymore!
Frequently Asked Questions (F.A.Q’s):
Can You Completely Uninstall the Com.Sec.Android.App.Camera Package?
Removing a default app completely from the phone is not an easy way for security reasons. But if you are on a rooted phone, you can uninstall it with third-party app removers. But then you will have to switch to third-party camera apps.
Is the Com.Sec.Android.App.Camera Bloatware?
No, it is not bloatware. Because without the package you cannot run your system camera app to capture moments. If you disable the package, the camera will start acting up. But when you remove bloatware it does not affect the major functions of your phone. So, the camera package is not bloatware rather it is an important part of your phone.
Does the Camera App Package Cripple Phone’s Performance?
No, it does not. It does not take up much RAM space. So, it does not drain out the performance. But the corrupted cache files of the camera app can sometimes slow down the performance.
Conclusion
The com.sec.android.app.camera is the unique identifier set to distinguish Android packages from one another. This package stores the data and cache files needed for the Camera app to run correctly. Undoubtedly, it is a must-to-have package for the proper use of the digital Android camera.
We do not recommend removing the app or package. However, if no workarounds seem to fix its error notification or technical error, you must visit an Android repair shop without any hesitation.
Recent Posts
Blog Introduction: If you're playing an app on your Android smartphone and it comes with an OBB file, you may wonder how to open it. OBB files are data files for certain Android apps, just like APK...
Qlink phone is a blessing for anyone who needs the smartphone service badly but can't afford the costly packages to use it. Through this free service phone or the Qlink phone, the user can choose any...

